Coming Together: Writing the Backend and Deploying
UrlMem.com is live! But note that future changes might erase your shortened URLs…
In this post, I’ll explain my thought process while writing UrlMem’s backend, and then the process of deploying the whole thing to Heroku. I’ll also be making some changes to the frontend.
Frontend Changes
I made some minor changes to the frontend. Most noticable, I added animations to the output boxes:
I did this using React Transition Groups, which simply manages CSS transitions. In order to do this, I also had to associate a key with every output box - I simply used the index of the url pair as its key, or “id.” The CSS is available in App.css, here is the relevant React code:
In addition, I got the copy button to actually work. I considered making the copy button adaptive - in which case it would hide when a user’s browser didn’t support copying - but I decided against that, as caniuse indicates that 95% of users will have compatible browsers.
The Backend API
The next step was to decide how the server and client would interact. I decided that the server would have three endpoints as follows:
- /custom
- /random
- /[a-z]*
The /random and /custom routes both take a long URL to shorten, while the /custom route also takes a custom shortening. A typical shortening request might look like this:
The /[a-z]* route catches any other requests. If the request is a valid shortening, it redirects the user to the relevant website. Otherwise, the user is redirected to the homepage.
Writing the Backend
Now I’ll go through some especially relevant parts of UrlMem’s backend code - the complete code (as of this post) is available here as index.js.
Here follows the route for custom shortenings:
First, the server checks if the required parameters were actually sent. The only case that they wouldn’t be is if someone was trying to make bad requests to the website…
Then, the server creates the shortening if the custom URL requested isn’t already in use. The function customWordUnavailable also checks for things like the empty string - this prevents someone making the shortening ”” -> “TinyUrl.com”. If they did, then any request to UrlMem.com/ would redirect to TinyUrl. That would be bad.
Other than that, the only other code of note is this line:
This is only necesary for when things are deployed - when the React app is built, an optimized version will be placed into client/build.
Deploying
The first step to deploying was to ensure the latest version of the client was built using npm run-script build from the client directory. At that point, running npm start would run the whole shebang - no need to use npm run start-dev as I showed two posts ago.
Next, I created a file .env with the following contents in the urlmem-app directory:
This tells Heroku not to expose the source code (which matters for closed-source projects).
Then, I updated package.json so that Heroku would know how to run things:
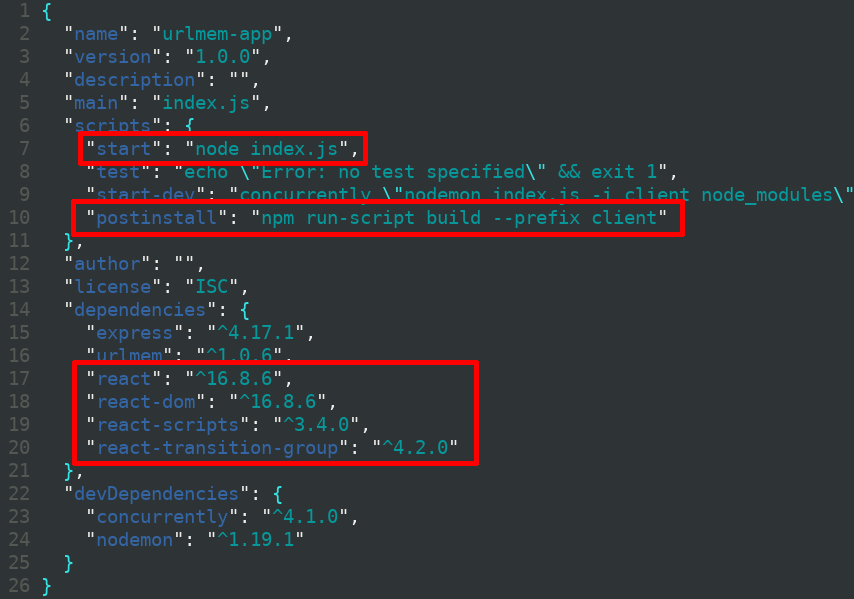
The postinstall script tells Heroku how build the frontend, while the start script tells Heroku how to run the server. The additional dependencies are required so that Heroku can build the React frontend.
An issue I encountered in the next step was conflicting library versions - so at this point I also deleted node_modules and package-lock.json from both the urlmem-app and client directory.
Next, I installed heroku, and from terminal ran the following commands:
Note that I ran git init in order to create a repository at the root of UrlMem’s website code. I have UrlMem inside of a larger repository, so if I hadn’t done this, the whole larger repository would have been pushed to Heroku.
Adding a Domain Name
At this point, UrlMem was available at urlmem.herokuapp.com. The next step was adding UrlMem.com. So I bought the domain name from Google Domains, and then ran the following:
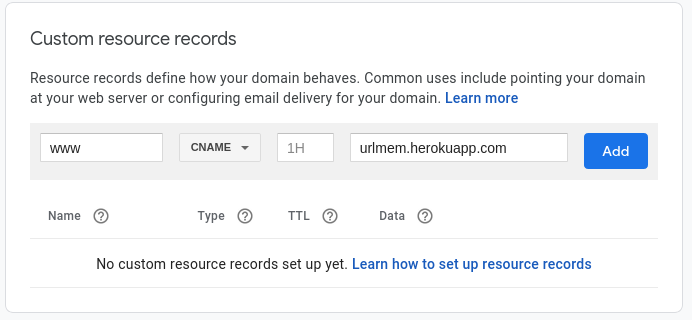
Next, from the DNS section for the domain at Google Domains, I added an appropriate resource record:
I also set up subdomain forwarding:
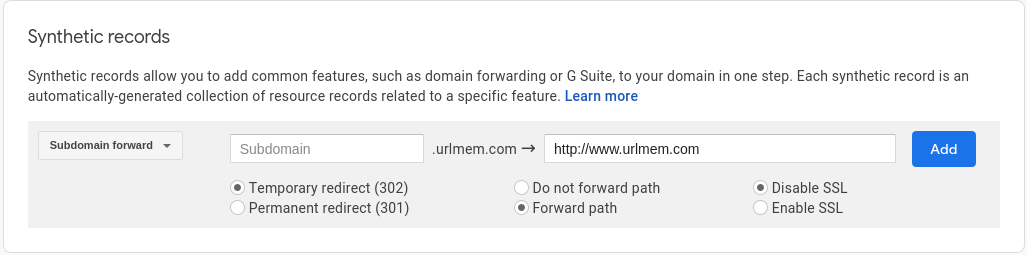
Subdomain forwarding ensures that UrlMem.com will forward to www.UrlMem.com. I disabled SSL, as that would cost money.
I also enabled path forwarding, as I want UrlMem.com/stuff to forward to www.UrlMem.com/stuff, rather than www.Urlmem.com.
Quck Note aboute SSL
At this point copy paste didn’t work when deployed - this is because I was using http, instead of https. Using https isn’t free on Heroku - but for anyone interested in getting it to work with Google Domains, this tutorial is excellent (and short).
What’s Next
Right now all of the URLs are saved in memory. So if I restart the server, or if there is a crash, all of the url mappings are gone. A next step is to write mappings into a databse to avoid this issue.
Additionally, one time I got back “bullsex.” While the option for custom URLs is a great fix for this, it would be cool to avoid returning bullsex in the first place. One fix would be to reject words that contain “sex” and other interesting subwords. A more interesting approach would be to implement pronounciation prediction - thus the server could also pass over “bulsecs.”
Stay tuned!
Sources
Tutorial: how to deploy a production React app to Heroku
How to set up Heroku SSL (HTTPS) with Google Domains in 2019
| Back to Project |
Get occasional project updates!
Get occasional project updates!