Going Headless: Making the Pi a Wireless Speaker
In this post I explain how I made the Pi automatically accept bluetooth connections and play music from devices without a monitor or user input. If you haven’t already, I suggest reading the previous post in this project.
Running the Pi headless
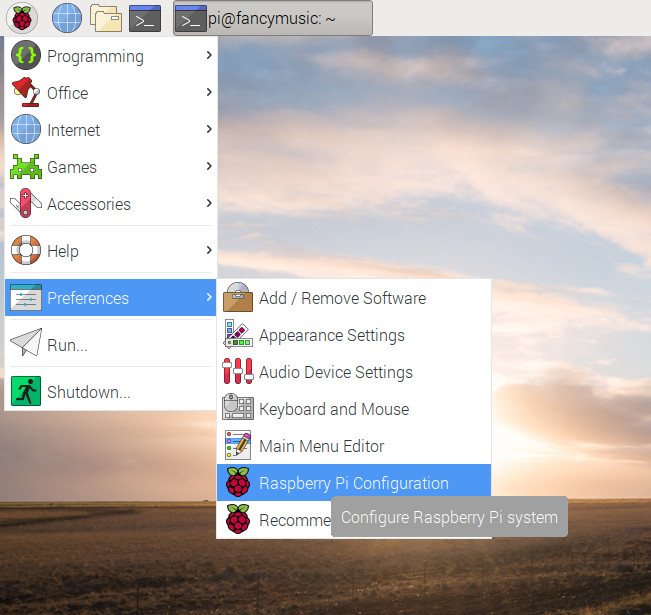
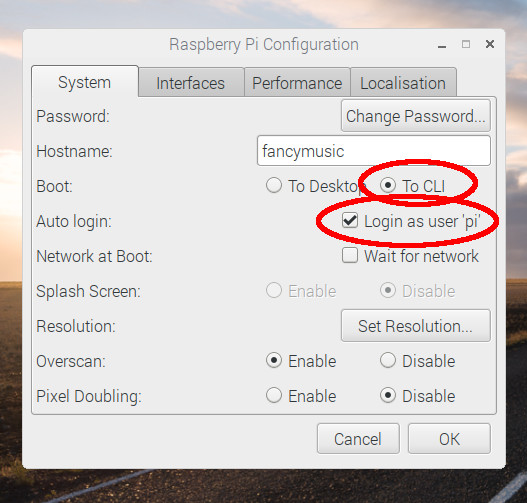
The first step is to configure the Pi to boot into a CLI (command line interface) instead of the desktop since the desktop is slow and unnecessary for this application. I clicked the Raspbian menu, “Preferences”, then “Raspberry Pi Configuration”. Under “System” I changed the “Boot” option to “CLI”. I also made sure auto login was enabled. Lastly I restarted the Pi.
The Auto-Connect Script
I wrote a script auto-bt.sh that automatically pairs and connects with incoming bluetooth connections, and put it in a new folder /home/pi/visualizer. Then in terminal, I ran the following command to make the file executable:
Here it is; you can skip the explanation or follow along as I explain each part in detail:
Line 3 directs audio to the Pi’s audio jack - I explain this exact line in depth in the previous post.
CLI program bluetoothctl is for interacting with bluetooth devices - pairing, connecting, disconnecting, and more. The command stdbuf runs bluetoothctl while buffering its output differently. The -oL flag tells stdbuf to buffer the output of bluetoothctl by Line - it’s easier to work with bluetoothctl’s data line by line. The command coproc runs this whole command as our code does other things. It also points the output of bluetoothctl to COPROC[0], and the input to COPROC[1]. These two variables contain what are called file descriptors.
When we later run this script without the desktop environment, bluetoothctl will take some time to start bluetooth - so this command waits for 7 seconds. This isn’t the most elegant solution, but I use it for the sake of simplicity.
This command starts PulseAudio, which is necessary for bluetooth audio. PulseAudio won’t start when run from root, but this script is run as root, so sudo -u pi is necessary to run the command as the user pi. If you run this script while using the Pi’s desktop environment, this line will output an error as PulseAudio runs automatically, but the script should still work.
This line allows devices to pair to the Pi. The >& operator routes the output on its left hand side to the input on its right-hand side, in this case bluetoothctl’s input. Usually this operator is just >, but the & is required since the right hand side is a file descriptor and not a file name.
On the right hand side the variable COPROC[1] holds the file descriptor for the input of bluetoothctl. The ${} around it expands the variable into the file descriptor that it contains.
On the left hand side of the >&, we see the echo command being used to output the command it’s given. Here that’s pairable on, allowing devices to pair with the Pi. Since bluetoothctl wants input line by line, the -e flag tells echo that \n is a newline, not a slash and the character n.
This line is formatted like the one above, but the command discoverable on allows other bluetooth devices to see the Pi.
An “agent” is some particular way of pairing bluetooth devices. The command agent NoInputNoOutput tells bluetoothctl to pair using an agent that requires no interaction from the user, making pairing automatic.
The last command, default-agent, makes the current agent (in this case NoInputNoOutput) the default agent for future pairings.
After bluetoothctl is set up, an infinite loop is run to pair and connect to incoming devices.
This line reads the next line from the output file descriptor of bluetoothctl (COPROC[0]) into a variable called line. The -r flag tells the read command not to treat special characters like \t or \n differently than other characters - we don’t want data changed. The u flag signifies that a file descriptor will be read from.
This line is for debugging - it shows us what bluetoothctl output.
This if statement checks if a device is trying to pair or connect. When a device tried to connect or pair, bluetoothctl outputs a line containing Paired: yes. The line will have other stuff too - the asteriks signify that the other stuff doesn’t matter. The if statement uses [[ ]] because they allow the use of these asteriks - if statements in bash can also be surrounded by [ ], ( ), or nothing at all, according to ocassion.
For reference, here is what $line will look like when the if statement is entered:
Here’s the next line in the script:
This line puts the mac address of the device trying to connect or pair into the variable mac. The first segment echo $line | passes the current line to text processing command awk. Awk is a little complicated to explain here, but at a basic level it parses lines of text. The mac address of a connecting device is the third from last word in the line that contains “Paired: yes”. In awk, $NF refers to the last word, so $(NF-2) refers to the MAC address of the connecting address.
This line is for debugging - it should output the MAC address of the device trying to pair or connect, in the format “AA:AA:AA:AA:AA:AA”.
This line trusts the paired device so that it can connect automatically.
This line connects to the newly-paired device.
This if statement checks if the bluetooth controller has stopped waiting for connections, if so the next line tells the controller to continue to wait for connections.
Connect on Boot
I used cron, a task scheduler for linux, to run the script automatically on startup. I ran sudo crontab -e, and at the end of the file, added the following line:
This line tells cron to run the startup script whenever the Pi reboots, redirecting the output to log.txt for debugging purposes. Other than running scripts at reboot, cron can run scripts at specific times such as every Tuesday.
On the version of Raspbian I run, reboot cron jobs don’t run. To fix this, I ran /etc/init.d/cron start. Then I added the line /etc/init.d/cron start to the end of file /etc/rc.local, right before exit 0.
After rebooting the Pi, I was able to pair and connect my phone, and music would play from the speaker connected to the Pi. Next time, we’ll see a (very) bare-bones visualizer emerge.
| Back to Project |
Get occasional project updates!
Get occasional project updates!